How to configure shipping for TikTok Shop US?
August 04, 2026 · Updated
After connecting your TikTok Shop to Tapstitch, you'll need to complete your shipping setup in TikTok Shop Seller Center before you can publish products.
This setup tells TikTok which warehouse to use, how to charge shipping fees, and which Tapstitch warehouse each product maps to when it's published.
Note: TikTok Shop calculates shipping using the template assigned to each product's warehouse. You can create multiple warehouses for different product lines, but TikTok may not let you delete a warehouse once it's created.
Step 1: Add your pickup and return warehouse
TikTok Shop may suggest using your business profile address as your default pickup and return address. For Tapstitch products, we recommend creating a dedicated Tapstitch US Warehouse instead.
Add a pickup warehouse
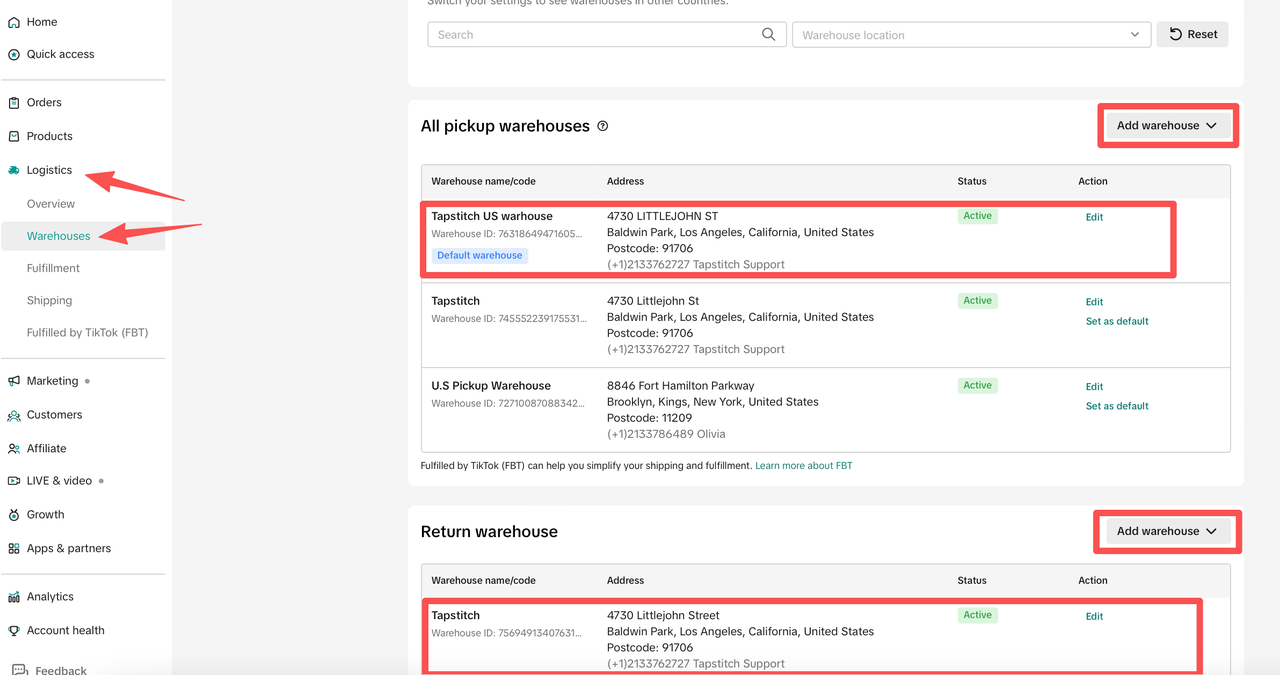
- In TikTok Shop Seller Center, go to Logistics > Warehouses.
- Under All Pickup Warehouses, click Add Warehouse.
- Select United States as the warehouse country.
- Enter the warehouse information below.
- Set the shipping region to United States (all states).
- Click Save.
| Field | What to enter |
| Warehouse name | Any descriptive name, such as Tapstitch US Warehouse |
| Contact person | Your name or your business contact name |
| Phone number | Your phone number |
| Address | 4730 Littlejohn St, Baldwin Park, California, 91706 |
| Shipping regions | United States, all states |
Configure your return warehouse
Next, set up your return warehouse. You can use either your own address or the Tapstitch warehouse address, depending on how you want returns to be handled.
- Use your own home or business address if you want eligible returns sent back to you.
- Use the Tapstitch warehouse address if you don't need items sent back. Items returned to the Tapstitch warehouse may be donated and cannot be recovered or resold.
Choose the option that best fits how you manage returns for your business.
Tip
If you plan to resell non-defective returns or use them for creator giveaways, samples, or social content, set your own address as the return warehouse. This gives you more control over returned inventory.
Step 2: Switch the shipping method to Seller Shipping
After creating your warehouse, TikTok Shop may enable TikTok Shipping by default. To ensure Tapstitch can receive and fulfill your orders correctly, you'll need to switch the warehouse to Seller Shipping.
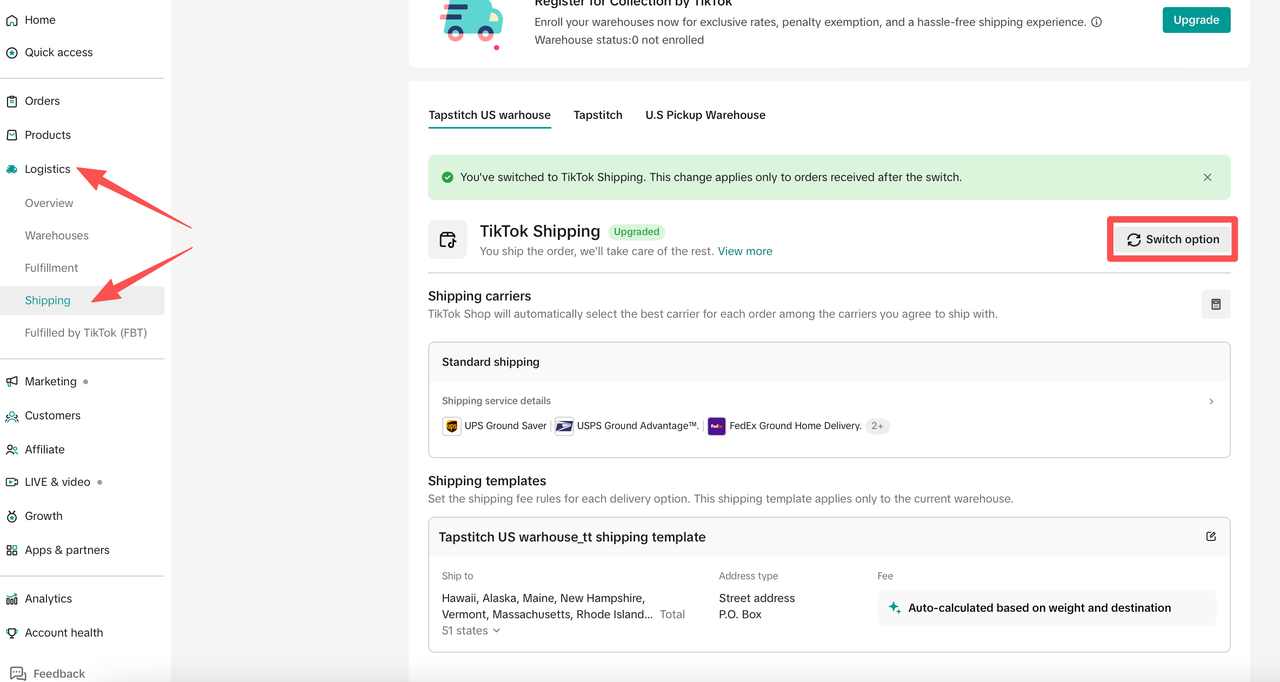
- In TikTok Shop Seller Center, go to Logistics > Shipping.
- Select the warehouse you created for Tapstitch products.
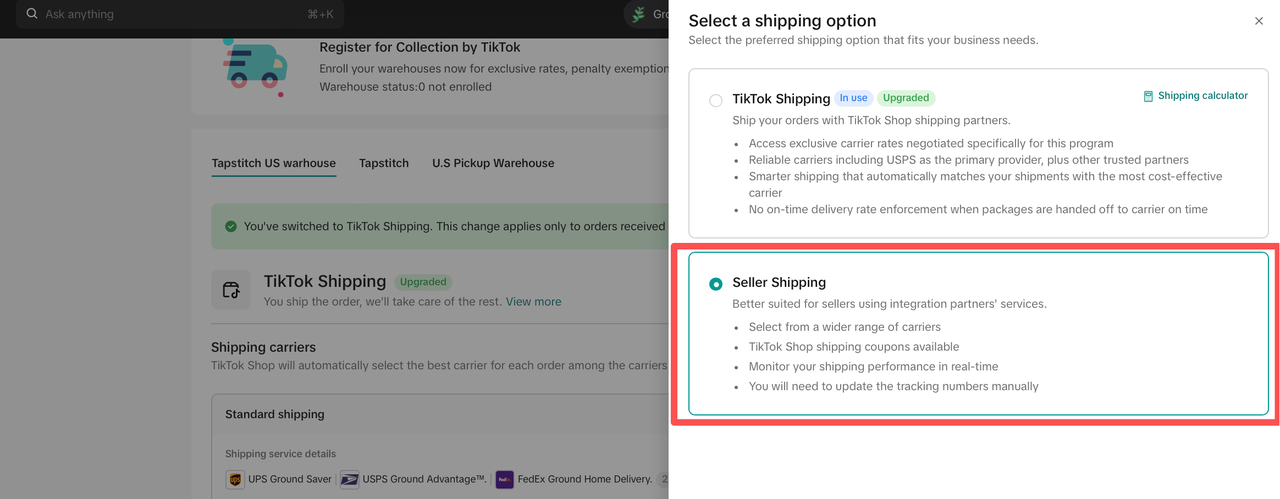
- Click Switch Option.
- Select Seller Shipping.
- Click Confirm to save your changes.
Important
This step must be completed before publishing Tapstitch products. If Seller Shipping is not enabled for the selected warehouse, product publishing may fail or show a shipping-related error.
Step 3: Create a shipping template
Once Seller Shipping is enabled, TikTok will ask you to create a shipping template. This template controls what buyers see at checkout. Choose the option that best fits your pricing strategy.
| Option | Best for | How it works |
| Free shipping | Stores that prefer simple checkout pricing | Set the shipping fee to $0.00 USD and include shipping costs in the retail price. |
| Quantity-based shipping | Stores that want shipping fees to vary based on order size | Configure shipping rates based on the number of items a customer purchases. |
Option A: Free shipping template
- In TikTok Shop Seller Center, go to Logistics > Shipping and select your Tapstitch warehouse.
- Click Create Template.
- Enter a template name and select the correct Ship From Warehouse.
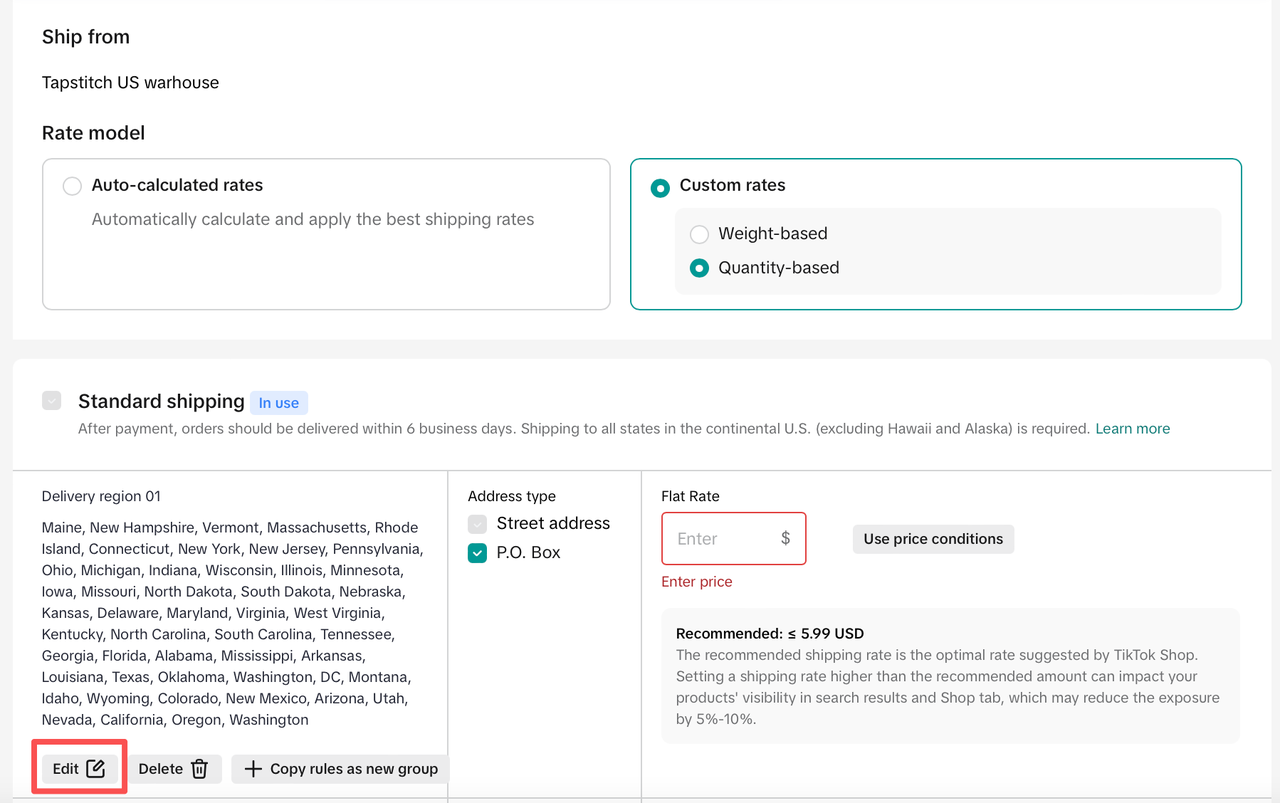
- Choose the Quantity-Based Rate model.
- Under Standard Shipping, set the shipping fee to $0.00 USD.
- Edit the delivery regions and include Hawaii and Alaska if you plan to ship there.
- Click Submit to save the template.
Note
If you offer free shipping, remember to review Tapstitch shipping costs in the product pricing table and build that cost into your retail price.
Option B: Quantity-based shipping template
- In TikTok Shop Seller Center, go to Logistics > Shipping and select your Tapstitch warehouse.
- Click Create Template.
- Enter a template name and select the correct Ship From Warehouse.
- Choose the Quantity-Based Rate model.
- Under Standard Shipping, select Use Price Conditions.
- Create shipping rate tiers based on the number of items in an order.
- Use the Tapstitch shipping rates as your reference when configuring each tier.
- Add enough tiers to cover your expected order sizes. Most sellers create 5 to 10 shipping tiers.
- Edit the delivery regions and include Hawaii and Alaska if you plan to ship there.
- Click Submit to save the template.
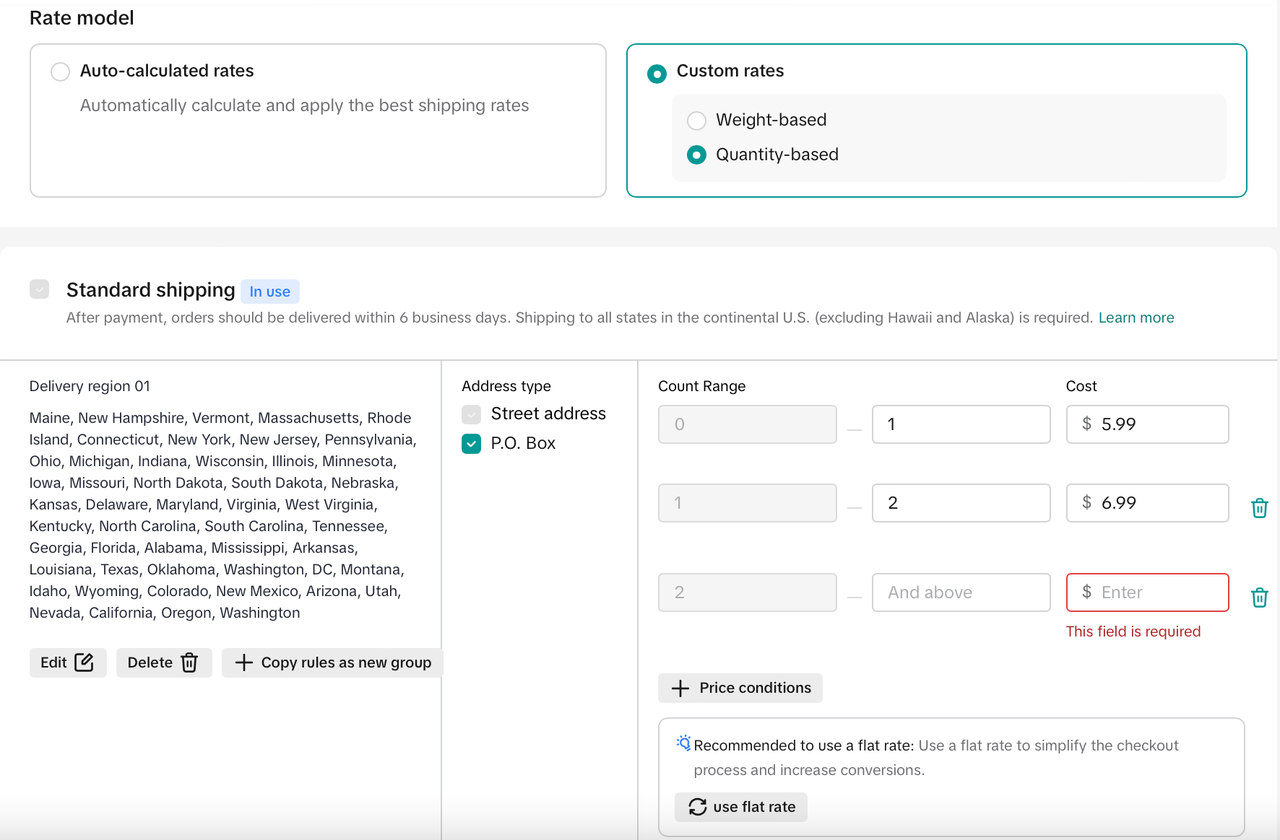
Example: Say shipping one T-shirt within the United States costs $4.75 USD, and each additional T-shirt adds $2.40 USD. Set your quantity-based tiers to closely match those costs. This keeps the shipping fees in TikTok Shop in line with your actual fulfillment costs.
Step 4: Map the TikTok warehouse in Tapstitch before publishing
After the TikTok shipping setup is complete, finish the warehouse mapping inside Tapstitch. This ensures that products published from Tapstitch use the correct TikTok warehouse and shipping template.
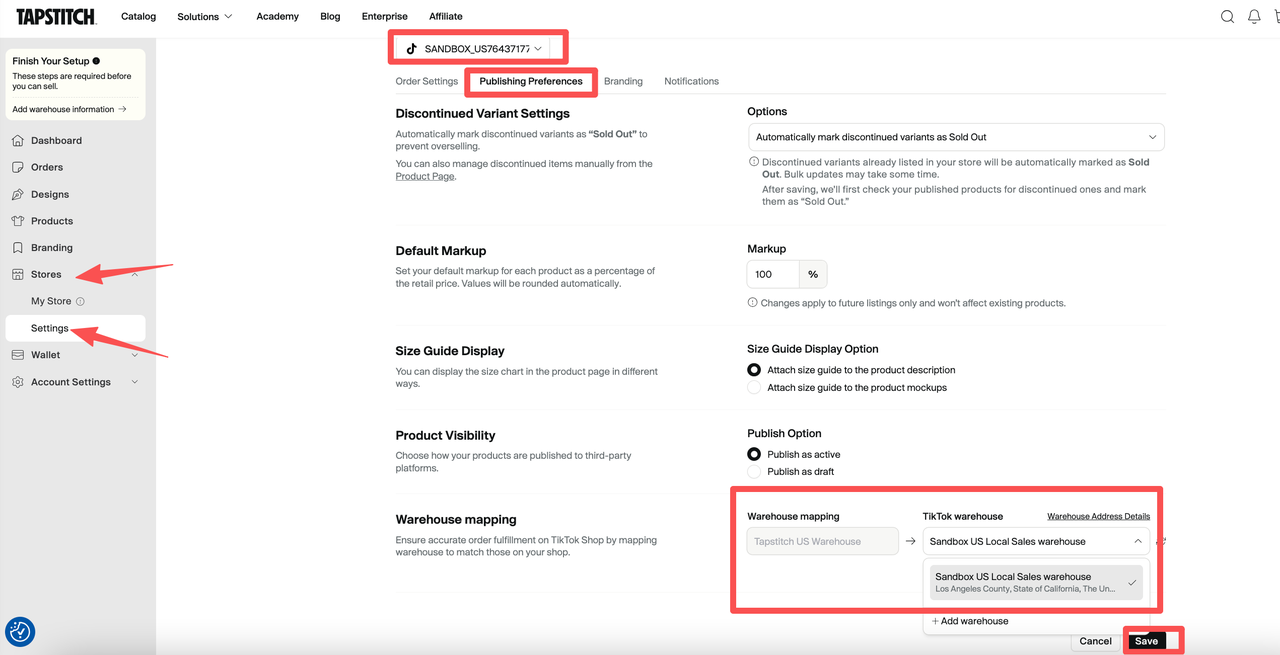
- Open Tapstitch.
- Go to Stores > Store Settings.
- Select the TikTok Shop you want to publish to.
- Open Publishing Preferences.
- In Warehouse Mapping, match your TikTok default warehouse with the Tapstitch warehouse.
- Save the setting.
- Continue creating and publishing your products.
Reminder
If the selected TikTok warehouse does not have Seller Shipping enabled, Tapstitch may not be able to publish the product successfully.
You’re ready to publish
Once the pickup warehouse, return warehouse, Seller Shipping method, shipping template, and Tapstitch warehouse mapping are all set up, your TikTok Shop US shipping configuration is ready. You can now create products in Tapstitch and publish them to TikTok Shop.
Was this article helpful?
2 found this helpful