How to Update a Published Listing to the Latest Version
July 30, 2026 · Updated
When a new version of a product is available, you can update your published listing by creating a new design with the latest product version, replacing the existing design mapping, and syncing the changes to your store.
Before You Start
Before updating your product, make sure you have the following ready:
- The product ID of the latest product version, such as RT0086-C001-V3, or keywords that can be used to search for the product.
- The product ID or keyword of the older product that has already been published to your store.
- The artwork, color, size, print area, and design settings you want to use for the updated product.
- Make sure your store is connected and that the product can be edited and synced.
| Why can’t I just edit the old design? Existing designs are linked to the specific product version. To ensure your published product is updated to the latest version, a new design must be created for that new version to then bind that new design to the already published product. |
Quick overview
| Step | What to do | Details |
| 1 | Create a new design first | Find the latest product version in the Catalog, open the product details page, redesign the product, and save it. |
| 2 | Edit the existing published product | Search for the published product in Products and open the Edit page. |
| 3 | Replace the design mapping | Remove the old design mapping, select the new design, and match the correct color, size, and variant. |
| 4 | Submit the update to your store | Review all variants, then click Submit to store to sync the update to your sales channel. |
Step 1: Search for the latest product version
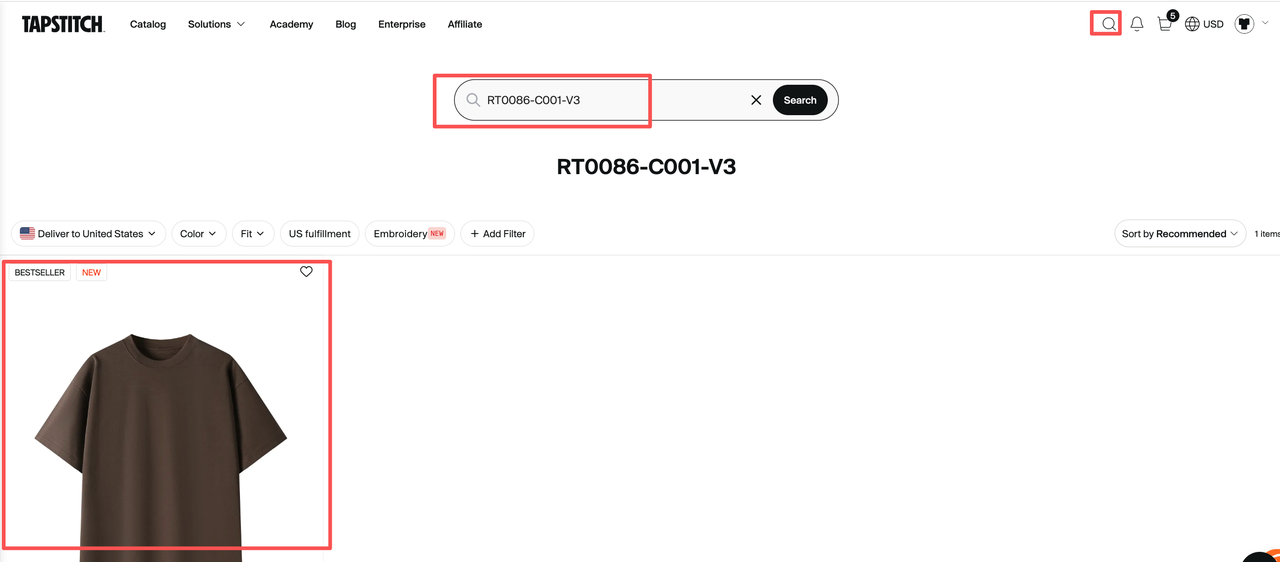
- Go to the Tapstitch Catalog page.
- Click the search icon in the upper-right corner of the page.
- Enter the product ID of the latest product version, such as RT0086-C001-V3, then click Search.
- Find the matching product in the search results and open the product details page.
- After this step, you should be on the product details page for the latest version, and the product ID should match the ID you searched for.
Step 2: Create a new design using the latest product version
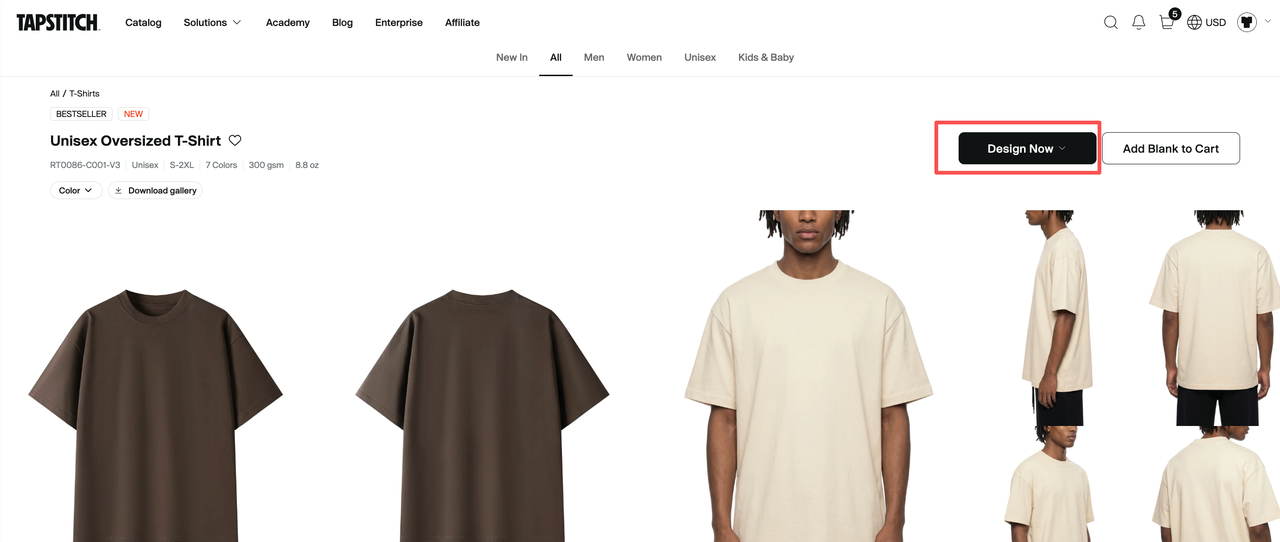
- On the latest product details page, click Design Now.
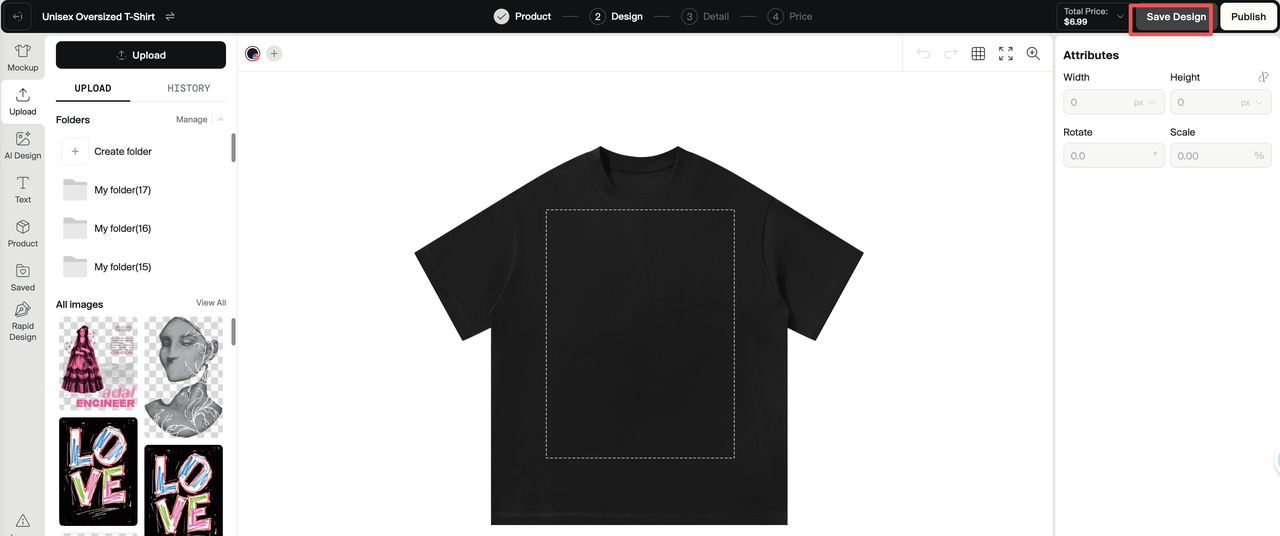
- In the design tool, upload or adjust your artwork and check the print area.
- When the design is ready, click Save Design.
- Tapstitch will save this as a new design version.
- Make a note of the new design ID if available. You will use it later when searching for the new design in the Designs tab.
Step 3: Find the older product that is already published
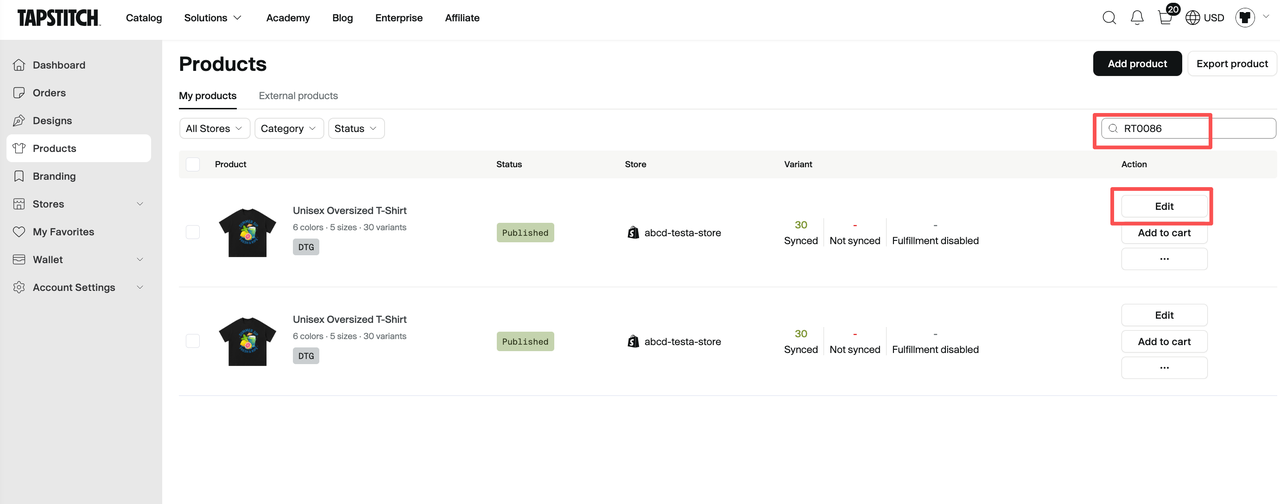
- Go back to the Products page in your Tapstitch dashboard.
- Search for the older published product by product ID or keyword.
- Find the product that is already linked to your store.
- Click Edit on the right side of the product row.
- On the edit page, you can view the external variants from your store and the Tapstitch design variants currently mapped to them.
Step 4: Remove the old design mapping
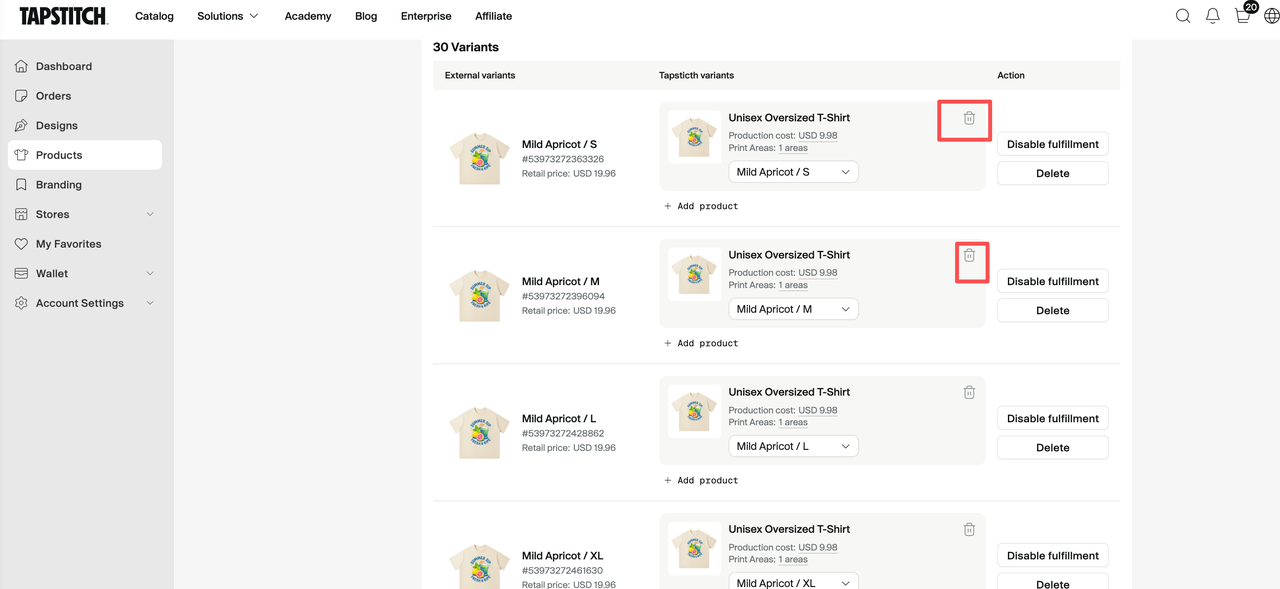
- In the Variants section, find the old design currently mapped to the product.
- Click the delete icon on the old design card.
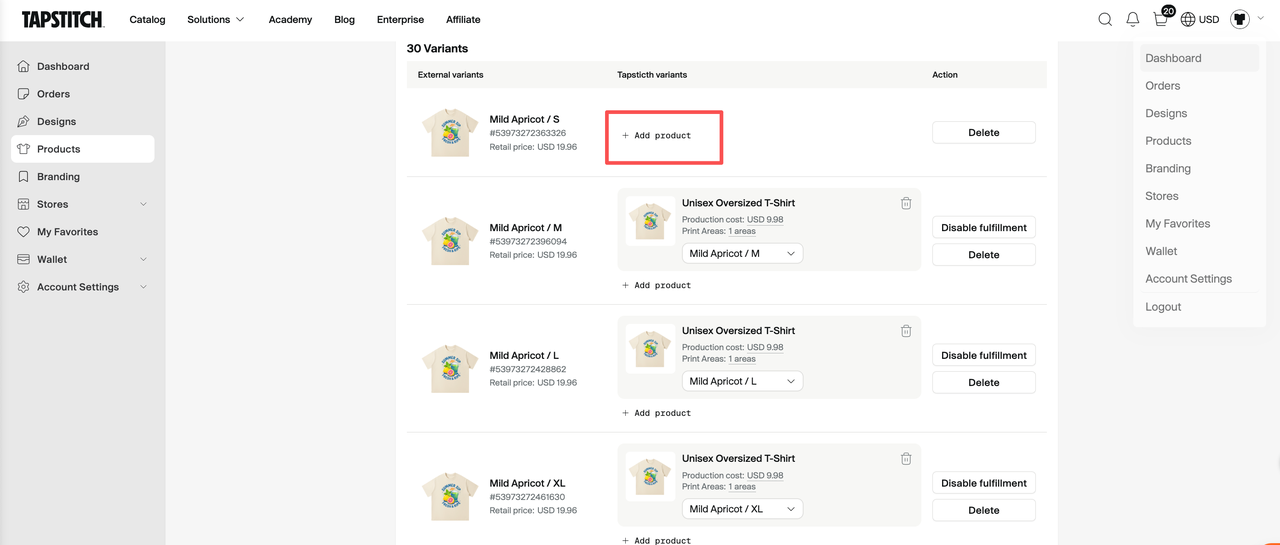
- After removing the mapping, the variant will be ready for you to add a new product or design.
- Removing the mapping does not immediately delete or change the product in your store. The store product will only be updated after you bind the new design and click Submit to store.
Step 5: Select the new design and match the variant
- Click + Add product.
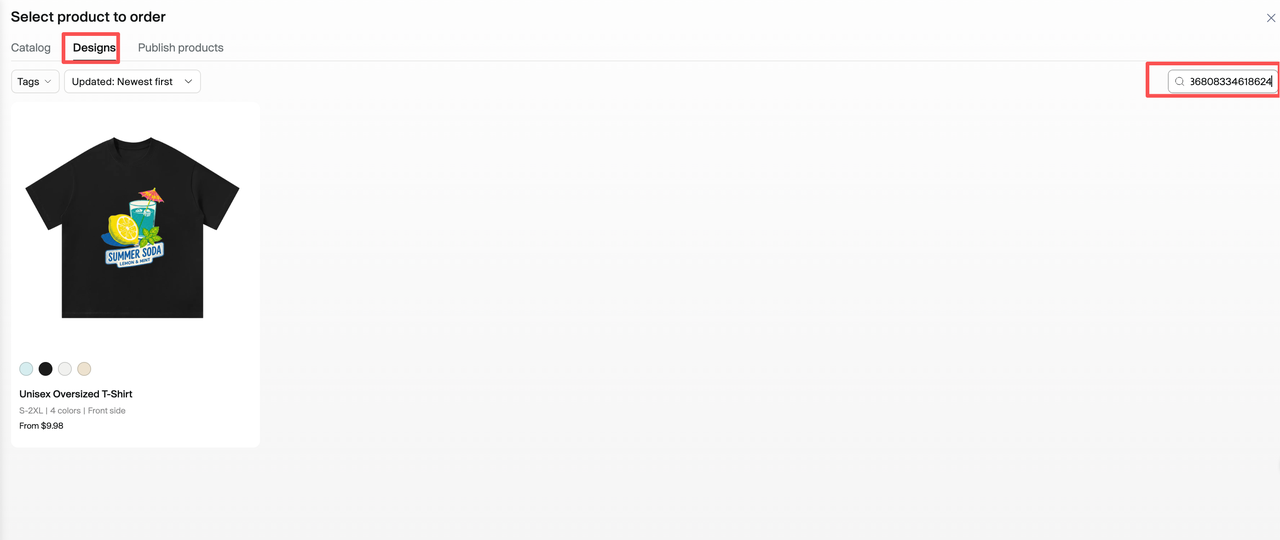
- In the selection modal, switch to the Designs tab.
- Search for the new design you just saved, then select it.
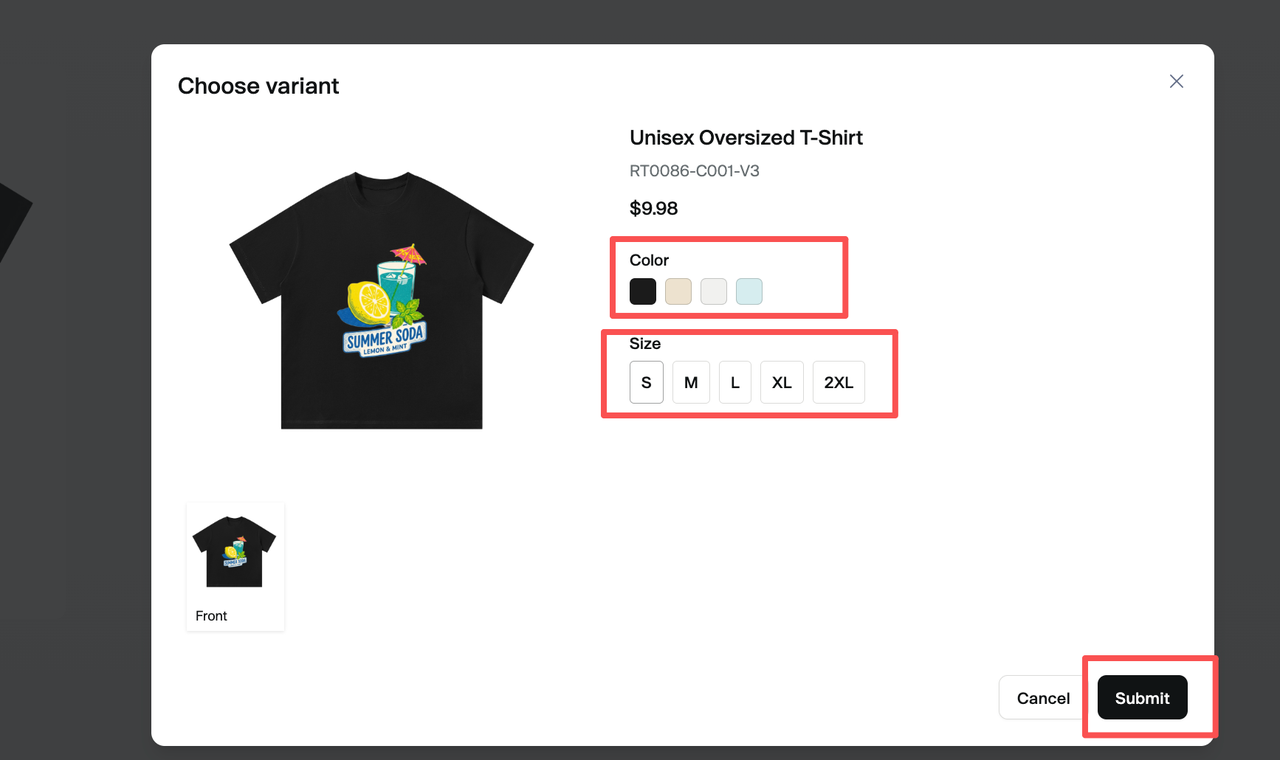
- In the Choose variant modal, select the correct Color, Size, and other variant options.
- Click Submit to finish the mapping.
- If your product has multiple colors or sizes, check each variant carefully to make sure every external variant is mapped to the correct new design variant.
Step 6: Submit the update to your store
- Confirm that all variants you want to update are mapped to the new design.
- Review the product images, price, colors, sizes, print areas, and other product settings.
- Click Submit to store at the bottom of the page.
- Wait for the sync to finish, then check the product in your store admin and storefront.
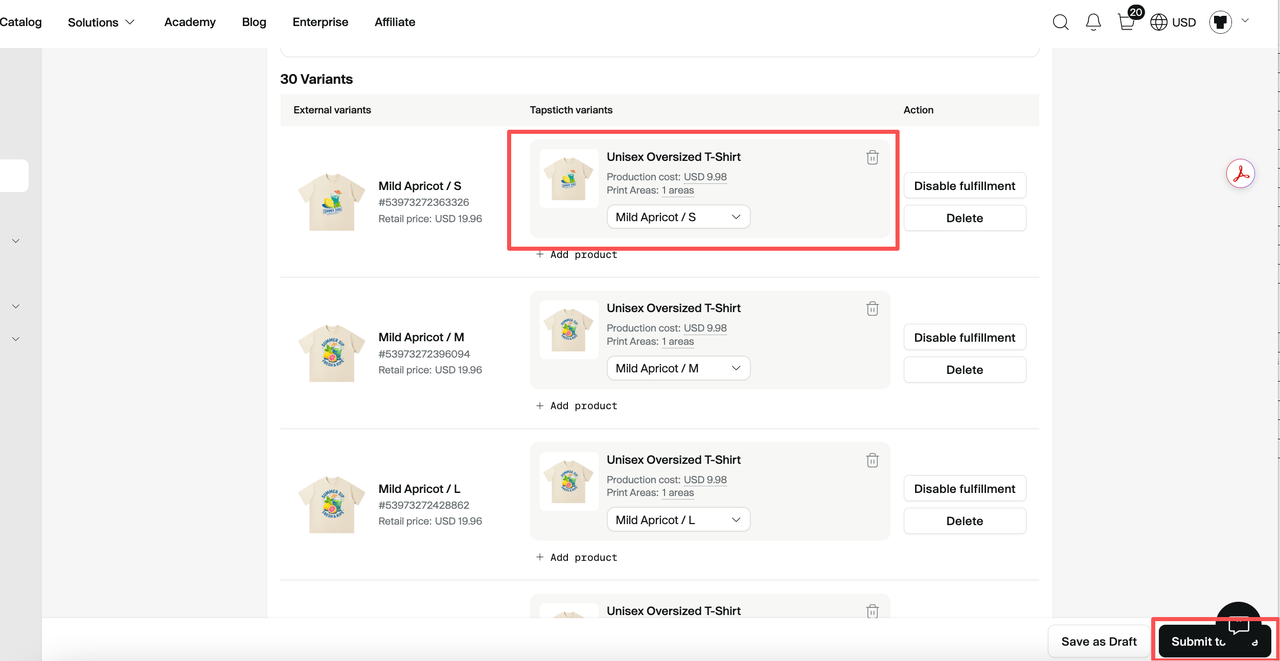
| Expected result Your published store product keeps its existing store relationship, but the Tapstitch design mapping is updated to the new design created from the latest product version. |
Frequently asked questions
1. Why can’t I find the new design in Designs?
Make sure you clicked Save Design in the design tool. If you opened the design tool but did not save, Tapstitch will not create a new design version.
2. Will removing the old design mapping affect my store product immediately?
No. Removing the mapping only changes the relationship inside the Tapstitch edit page. Your store product is updated only after you bind the new design and click Submit to store.
3. Do I need to update every variant?
Yes, if your product has multiple colors or sizes. Review every external variant and make sure each one is mapped to the correct new design variant.
4. After you finish, check the following:
- The product update has synced successfully.
- The product images and mockups show the new design version.
- Colors, sizes, and SKUs match the product in your store.
- Product price, production cost, and estimated profit look correct.
- The product page in your storefront displays correctly.
5. How do I update an On Hold order after changing the design in Store Products?
If you want to use the latest design, go to Orders and click Resync on the On Hold order.
Short workflow
Catalog search for the latest product ID → Open product details → Design Now → Save Design → Products search for the older published product → Edit → Remove old design mapping → Add product → Designs search for the new design → Select variant → Submit → Submit to store.
Was this article helpful?
1 found this helpful